Tables
What is the
relationship between a table and an external resource?
See also: Table Properties,Table Display Features, Table Scripting
Introduction
A Table represents an array of data values. The data might be loaded from a database, an XML document, or some other external resource, and can also be saved back to the resource. Alternatively, a table might just be used as a temporary working structure in support of the application logic.
Each table row consists of a number of columns (which are very similar to Fields), and a table can have any number of rows. A table can be displayed to the user as a grid using a Table Control or in a more flexible format using a Repeater Control.
In the Form Editor, Tables are added and maintained in the Tables View.
Click on one of the following links for further information:
- Table Display Features – features provided by Table Control, sorting, scrolling, row selection, row insertion, row deletion etc
- Table Scripting – information on table events and script programming with tables
Tables View
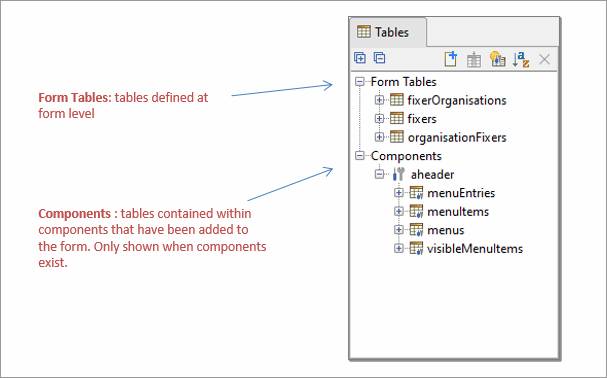
The Tables View shows all the form’s tables. Any tables from components that have been added are shown separately under the Components heading. Opening an individual component shows the name of each table as configured in the source component, moving the mouse over the table name shows the fully prefixed name of that table in the form. The diagram above shows the tables for a form, but the display is very similar for all other entities that can have tables i.e. Application Layouts, Components, Rest Services, Integration Services and Workflow Processes; the only difference is that the heading name Form Tables changes. Application Layout fields are not shown on the Form’s Fields View.
The tables view consists of the tables toolbar followed by a list of all tables in the form. Initially, tables are displayed in alphabetical order. Any new tables are added to the top of the list, which can be re-sorted into alphabetical order by clicking the Sort tables icon.
Clicking on a table in the list displays the Table Properties in the properties view.
Clicking on a table column in the list displays the Table Column Properties in the properties view. Moving the mouse over a column shows the full table column name.
To select a range of tables and/or table columns hold down the Shift key. To select multiple non-contiguous tables and/or table columns hold down the Ctrl key.
Tables toolbar
Following functions are available; shortcut keys shown in parentheses. Please note that short cut keys apply only when the Tables View panel is in focus.
|
|
|
Expand all tables in the tree to show table columns |
|
|
|
Contract all tables in the tree to show just table names |
|
|
(Ctrl N) |
|
|
|
|
|
|
|
(Ctrl I) |
Insert a Fields & Tables Component |
|
|
|
Sort tables in alphabetical order |
|
|
(Delete) |
Delete selected tables and/or table columns. This also removes any table controls or table column controls that refer to the deleted items. |
Right click functions
Following functions are available when one or more tables are selected; shortcut keys shown in parentheses. Please note that short cut keys apply only when the Tables View panel is in focus.
|
New table |
(Ctrl N) |
|
|
Delete |
(Delete) |
Delete selected tables and/or table columns. This also removes any table controls or table column controls that refer to the deleted items. |
|
Insert a Fields & Tables Component |
(Ctrl I) |
|
|
Add column(s) |
|
|
|
Delete |
(Delete) |
Delete selected tables and/or table columns. This also removes any table controls or table column controls that refer to the deleted items. |
|
Create Resource |
|
Create external resource. This option is only enabled when a single table is selected and the table is not already linked to a resource. Only database resources are currently supported. |
|
Cut |
(Ctrl X) |
Same as copy, but also deletes selected table(s) and column(s). |
|
Copy |
(Ctrl C) |
Copies selected table(s) and/or column(s) to the clipboard. When a table is selected, all columns are also copied. |
|
Paste |
(Ctrl V) |
Paste is only enabled when tables or columns have previously been copied to the clipboard. You can copy/paste tables/columns within a single form or component, or between forms and/or components. You can also copy columns from one table to another table. If the table prefix is already in use in the target form, a new prefix is created by adding an underscore and a number to the existing prefix and this new prefix is applied to all columns. Tables/columns are automatically renamed when the same name already exists in the target form; this is done by adding an underscore and a number to the table/column name. When copying and pasting columns from one table to another, select the target table, then select Paste. The link between a table and a resource is maintained so long as the resource is not already linked to another table in the target form. Column mappings are retained when a mapping to the associated resource field does not already exist in the target form. Note that mappings are retained even when the corresponding resource is not part of the target form’s business view. This means that you can paste tables, then later add the resource to the target form’s business view and mappings will not be lost. All associated texts are also copied and renamed as required. Dynamic list table column mappings are retained only where the mapped table columns also exist on the clipboard or when this is a cut/paste operation within a single form. When the pasted tables/columns include one or more deployed component tables/columns, the tables/columns are pasted as if they are not part of a component and double underscores in all names are changed to single underscores. |
|
References |
(Alt Ctrl R) |
Displays references to the selected table or table column in the References Panel |
|
Uses |
(Alt Ctrl U) |
Displays anything used by this table in the Uses Panel |
Current
row concept
The system maintains a current row for each table and all
references to column names within a table from script statements are
interpreted as referring to the value of the column on the current row. The
current row is set by the system as follows:
- When
an event is executed for a control inside a table e.g. clicking on a
button or a hyperlink, the current row on the server is set to the row
where the event occurred; when tables are nested all parent table values
are also set. This applies for controls inside a Table Control and inside
a Repeater Control and for both server-side and client-side events.
- When
looping through table rows using the FPL loop at table or Javascript TableRowIterator,
the current row changes with each successive iteration through the loop.
When all rows have been processed, the current row is reset to its
original value (before the row iteration started). If the row iteration is
interrupted e.g. by an FPL break command, the current row remains
set to the row at the break point.
- Row insertion using the FPL
insertrow FPL command, Javascript
Table.insertRow() method
or by the user clicking the add row button all set the current row
to the new row.
- Loading
a table using the FPL fetchtable FPL command or Javascript Table.fetchTable() method sets the first row as the current
row.
- Sorting a table using
the FPL sort FPL command or Javascript
Table.sort() method sets
the first row as the current row.
- Updating a table using
the FPL updatetable command
command or Javascript Table.updateTable () method may reset the current row in some circumstances.
- A
vertical scroll operation by the user sets the current row to the first
visible row of the new display.
- A
sort operation by the user sets the current row to the first visible row
of the new display.
Note that the current row can also be set directly using the
FPL settablerow() function
or the Javascript Table.setCurrentRow() method.
Here are some examples of script processing using the
current row concept (see Programming with Tables
for more details):
- A
validation script to check the credit limit column for each row :
Javascript:
if (tables.CUSTOMER.CREDIT_LIMIT.value >
10000 )
{
event.owner.addErrorMessage("Credit
limit exceeds maximum value of 10,000");
}
FPL:
if [CUSTOMER-CREDIT_LIMIT > 10000 ]
message 'Credit limit
exceeds maximum value of 10,000';
endif
The script is specified as a validation event for
table column CUSTOMER-CREDIT_LIMIT. It is executed for each row visible to the end
user. If an error message is issued, it is displayed above the row in error.
- Within
a loop through all table rows:
Javascript:
var orderTotal = 0;
var rows = tables.ORDER_ITEMS.rows();
while (rows.next())
{
if ( tables.ORDER_ITEMS.isRowDeletedByUser()
)
{
orderTotal += tables.ORDER_ITEMS.ITEM_AMOUNT.value;
}
}
FPL:
char ORDER_TOTAL = 0;
loop
at table ORDER_ITEMS
if [ $ROW_DELETED != 'Y' ]
set ORDER_TOTAL = ORDER_TOTAL + ORDER_ITEMS-ITEM_AMOUNT;
endif
endloop
- Displaying
a detail page via a hyperlink or a button. In this example the code below
is run as an on click event on column CUSTOMERS-CUSTOMER_NAME of table
CUSTOMERS and column CUSTOMERS-CUSTOMER_NAME has been declared as a
hyperlink. When the user clicks on the link, the current row is set to the
row on which the user has clicked, and details of the selected customer
are then displayed.
Javascript:
form.gotoPage(Pages.CUSTOMER_DETAIL_DISPLAY);
FPL:
goto page CUSTOMER_DETAIL_DISPLAY;
Page CUSTOMER_DETAIL_DISPLAY can contain
any or all of the columns included in the CUSTOMERS table. When this page is
displayed it will contain values from the table's current row i.e. the row on
which the user clicked the link. This list à perform action on selected item is a common programming
construct: the table is loaded with all needed columns, but only a subset of
these (possibly just an id) is initially displayed to the user as a hyperlink
in a table. The user then makes a selection and detailed processing is
performed on that particular item - in this example, the processing is to
display a detail page of the selected item. With Verj.io tables, this type of
processing can be achieved with hyperlinks, buttons, or by using the optional select column checkbox and
then adding one or more buttons at the bottom of the table to process the user
selection(s) and perform specific application functions on these selections.
What
is the relationship between a table and an external resource?
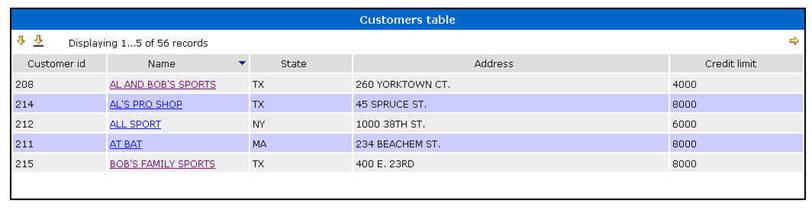
A table can optionally be 'backed' by an external resource and this backing resource is specified as a property of the table. Data is initially loaded from the external resource by using the FPL fetchtable command or Javascript Table.fetchTable() method. To save data to the external resource, the FPL updatetable command or Javascript Table.updateTable() method is used. Update table processing command takes care of all amendments that have been made to the table including updates, deletions and insertions. For example, the table shown above consists of the following elements:
|
Table: |
CUSTOMER_TABLE |
|
Table Prefix: |
CUSTOMER_TABLE |
|
Backing resource: |
Database
resource CUSTOMERS |
Data is loaded using either:
Javascript:
var rows =
tables.CUSTOMER_TABLE.fetchTable();
FPL:
fetchtable
CUSTOMER_TABLE;
And saved using either:
Javascript:
tables.CUSTOMER_TABLE.updateTable();
FPL:
updatetable
CUSTOMER_TABLE;
Any database resource used with tables must have the For use with table operations radio button checked.
The relationship between a table column and a resource field
is maintained using a field mapping in exactly the same way as for form
fields. These mappings can be displayed and maintained by clicking the mappings
icon on the form toolbar.
It is also possible to include columns in a table which are not backed by an external resource.
Tables with foreign keys
It’s common practice to use foreign keys to link information from other database tables e.g.:

In the above example we have a list of languages identified by a unique number (id) in the Languages table. The Users table has a languageId column which contains a number, this number specifies a language using the unique id of a language in the Languages table. The languageId column is a foreign key.
The requirement is usually to show the table (users in this example) replacing the
foreign key (languageId) with a description from the linked table
(languageDescription from languages). Additionally, if the table is editable, a
dropdown list of languages should be displayed. Verj.io supports the display
and update of tables in this scenario without the need to write complex SQL to
join database tables in the database resource.
(See Working with
Databases for more information)